How to Adjust a Dome Security Camera for the Best Angle
If your dome camera isn’t pointed the right way, it won’t help much — no matter how good the brand is. You might miss a face, a license plate, or even the whole incident. That’s why getting the camera angle right is one of the most important steps after setup.
And with the global video surveillance market expected to reach $88.71 billion by 2030, more and more people are using cameras to keep their homes and businesses safe. But buying a good camera isn’t enough — you have to set it up the right way too.
Here are the 7 tips to help you adjust a dome security camera for the best angle, so it can protect your home from phrogging.
#1. Choose the Right Mounting Spot
Where you mount your dome camera makes a huge difference. Even the best camera won’t help if it’s pointed at the wrong area. Think about the most important spots you want to keep an eye on — like your front door, driveway, hallway, or any entry point. Those are usually the best places to start.
Don’t mount it too close to corners or areas with a lot of clutter, as those things can block the view. Also, avoid placing it behind anything that moves, like tree branches or ceiling fans — movement like that can trigger false alerts.
If you’re placing it inside, mounting it on the ceiling gives you a wide view of the room. If it’s outdoors, make sure the camera is safe from the weather and not pointing at a wall.
A good mounting spot gives you better coverage, less adjusting later, and more useful footage when something happens.
#2. Keep the Height Around 8–10 Feet
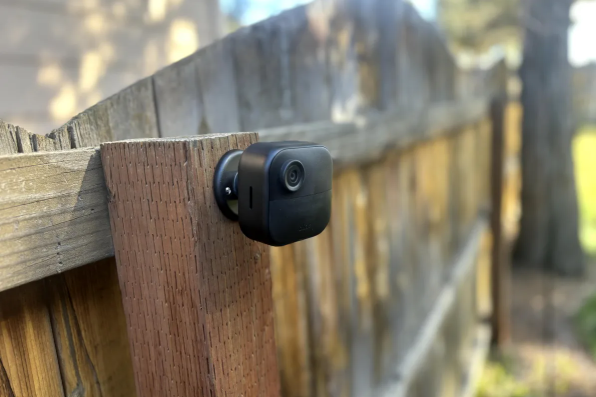
Image Source: CNET
The height you choose really affects what your camera can see. If you mount it too high, the footage might only show the top of people’s heads. If it’s too low, it becomes easy to block, bump, or tamper with.
The sweet spot for most dome cameras is between 8 and 10 feet off the ground. At this height, you’ll get a clear view of faces, actions, and even fine details like what someone is holding or wearing. It also gives you a wide enough view to cover large areas without losing quality.
For indoor cameras, 8 feet is usually perfect — especially in places like living rooms, hallways, or shops. Outdoors, go closer to 10 feet if possible, especially near doors or parking areas. That extra height helps keep the camera safe and harder to reach.
Note: Just make sure it’s still easy enough for you to access when it’s time to clean or adjust it.
#3. Avoid Facing Direct Sunlight or Bright Lights
One common mistake is pointing the camera directly at a window, light fixture, or the sun. But when strong light hits the lens, it creates glare, overexposure, or weird shadows that make it hard to see what’s really going on.
Sometimes, everything in the frame can look too bright, or faces might be hidden in shadows.
To avoid this, try adjusting the angle so the camera is slightly to the side of the light source — not directly in front of it. If you’re installing it outdoors, keep in mind where the sun rises and sets.
Also, avoid pointing it at car headlights or street lamps if possible. The goal is to get a clean, even picture — without blown-out highlights or pitch-black dark spots.
#4. Angle Down Slightly for Full Coverage
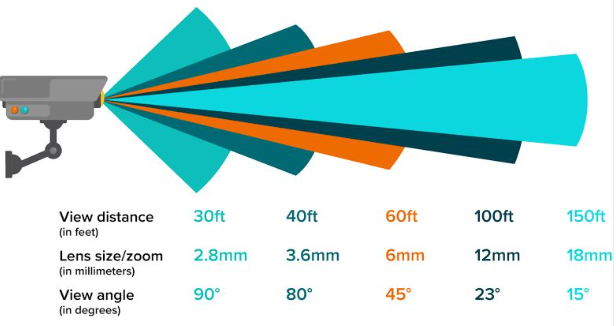
Image Source: LinkedIn
A small tilt can make a big difference. Once your dome camera is mounted, angle it down just enough to capture a wide view of the area — especially faces, not just heads.
Many people angle their cameras too flat or too high, and that leaves a blind spot right under the camera. That’s risky, especially with rising concerns like phrogging — where someone secretly lives or hides inside a home. You want the angle to cover floor-level movement too, not just doorways or eye level.
This is important in places like basements, stairwells, storage areas, or even closets where someone could try to sneak in or stay hidden. Don’t be afraid to test the angle by walking through the area yourself and checking the footage.
A clear angle helps you spot unusual behavior before it turns into a bigger problem.
#5. Tilt the Lens Toward the Most Important Area
Not every part of a room or yard needs to be watched equally. Focus your dome camera on what matters most. That might be your front door, back entrance, garage, or even a hallway where most movement happens.
The key is to make sure you’re capturing the right zone — the spot where someone would pass through, hide, or try to access. With incidents of phrogging and break-ins, it’s smart to keep a close watch on rarely used doors, attic hatches, or crawl spaces too. These are places people often forget to monitor, and that’s exactly what intruders count on.
A good angle should let you see someone approaching, not just after they’re already inside. Walk the area, look at where someone could hide or sneak in, then point the lens straight toward that path. Your footage will be way more useful if it’s focused on the actual risk zones.
#6. Use the Camera’s Field of View Smartly
Dome cameras usually have a wide field of view — but don’t waste it. Adjust a dome security camera lens or settings (if it’s a varifocal model) to match the space you’re watching. If you’re covering a big room or open yard, use the full width.
But if you’re focusing on something like a doorway or staircase, zoom in a little so details aren’t lost. Some phroggers target places like shared rentals, basements, or garage spaces — so those areas need sharper detail, not just a wide blur.
Also, check for distortion at the edges. Sometimes a wide angle can stretch faces or objects, making them hard to recognize. The goal is to see as much as possible clearly — not just everything at once. And always double-check your live feed or saved clips. You might think your view is fine until you spot a blind corner where someone could hide.
#7. Test Footage in Both Day and Night
Your camera might look perfect in daylight, but things change once the lights go out. Dome cameras often use infrared (IR) night vision, but it’s not always crystal clear unless you test and fine-tune it.
After setting up your angle, check the footage during the day and at night. Walk through the area yourself — see how your face looks on camera, how shadows fall, and whether the IR reflects off shiny objects or windows.
If you’re worried about phrogging, this step is a must. People hiding inside homes tend to move around more at night, so your camera should be ready for that.
Also, check if any furniture, doors, or corners look too dark. You want full visibility even when the lights are off. Sometimes a small shift in angle or moving a light source can solve the problem. Don’t just set it and forget it — test it, then adjust as needed.
Conclusion
So that’s it — 7 easy ways to adjust a dome security camera the right way. When your camera is in the right spot, at the right angle, and properly set, it can really do its job.
It helps you see what matters, spot anything strange, and feel more at ease. Whether you’re watching the front door or a quiet hallway, small changes in angle can make a big difference.
Take a little time now to adjust a dome security camera properly — it could save you from missing something important later.
FAQs
How do I adjust the angle of my dome camera?
To change the angle, remove the dome cover, gently move the lens to your desired view, and lock it in place using the adjustment screws. Make sure to test the live feed afterward. This is the best way to adjust a dome security camera for clear and useful footage.
What is the angle of view of a dome camera?
Most dome cameras offer a field of view between 70° and 120°, depending on the lens. Wider lenses cover more space but may sacrifice detail. Smaller angles give sharper images over shorter distances. Always check the lens specs before deciding where and how to place your camera.
How can I make my camera focus better?
First, clean the lens with a soft cloth. For cameras with manual focus, turn the focus ring until the image becomes sharp. If it’s a fixed lens, make sure it’s placed at the right distance. Also, check lighting conditions — low light can often make footage look unclear.
How do I maximize my camera quality?
Keep the lens clean, avoid placing the camera near bright lights or reflections, and use proper settings for resolution and frame rate. Test the view during both day and night. Make sure the area is well-lit and the camera isn’t too far from the activity you want to capture.
What mm is a wide angle lens?
A wide-angle lens is usually around 2.8mm to 3.6mm. It gives a broad field of view, which is great for covering open spaces. If you need to see further away with more detail, go for a higher mm lens like 6mm or above, but you’ll see a narrower area.